Thursday, May 2, 2013

Wildflowers & Deep(ish) Thinking


As the days grow longer and hotter, the colors seem to pull back into the earth where water is lacking. On a walk this morning, I was delighted to find this burst of color in a violet wildflower.

Besides walking being good for me (and yes, I know running is even better, I just can't endure that kind of self-inflicted torture for long) I enjoy the refreshment that occurs during that brief time of the day when the only things to interrupt my thoughts are chirping birds and the sounds of the wind whirling through the wheat fields.

All the crap in the world and in my personal life stay at bay and I entertain the more peaceful and imaginative things of life. I often feel like Sarah from Sarah, Plain and Tall minus the bonnet. In my mind, I've often thought life had to have been easier in Kansas in 1910. Life may have been simpler in some aspects, such as no commuting to work or lines at the grocery store, but the long, hard days of physical labor to support one's family don't really sound that exhilarating. Yet there will always be a part of me that wishes I could go back.

When I walk across the dirt roads surrounded by acres of machine-planted fields, I wonder what the land looked like in 1910. I wonder if violet wildflowers like the one from my walk sprouted up in greater number, or if, like now, their beauty is in their scarcity?

I love thinking about stuff like this, but don't be fooled, such moments of deep thinking are not so common that I can't enjoy a lame joke or laughing at others (and often myself). So what about you? If you could to a distant land of the past, where would it be? What do you wonder or assume about that time?

~Nicole

Monday, April 29, 2013

DIY Hand-Painted Wall Art

Isn't it the pits when you're all fired up for a project (like the cute ones you see on Pinterest) and part way in, everything goes wrong?

My friend was in the middle of adhering a supposedly self-adhesive saying to her bathroom wall. It was not going well because of the texture on the walls and then her darling niece made it worse by mangling half of the letters and guaranteeing they'd never stick. Oops.

I saw the aftermath and suggested we trace the letters onto the wall, peel off the sticker and fill in with acrylic paint. It takes a bit of time, but once it's done, it's not going anywhere!

Grab these items and maybe a glass of iced tea to get started:
~A saying or graphic you want to look at for a while
~pencil
~level or ruler
~eraser (Staedtler worked very well)
~tape
~paint brush (smaller= more control & definition)
~acrylic paint (cheap, quick-drying & water clean-up)
~paper towels & a few q tips for any mess ups

1. Prepare words/graphic for transfer. If using a projector, print onto transparency paper. Other ideas include buying letters from Joann's or Michael's, using Cricut or going old school and cutting letters/images out by hand.

The kit my friend bought had most of the words in black, but 'pray' in silver, so we had
planned to only hand-paint 'pray' in gold. Her niece's curiosity gave me a bit more to do!
2. If using words, lightly draw a level line in pencil where you want the lettering to be. Tape letters into place and step back to see if you like the placement from far away as well as close-up. Then start tracing. If using a graphic, simply pick the location and tape into place before beginning to trace.
* if walls are textured, like mine, it's okay that pencil marks are a bit rough- you can erase them after the paint has dried


3. Peel taped words/graphics off wall and get ready to paint! I had to do two coats, so focus the first coat on edging and the second on making the paint opaque.
*especially with lettering, the closer you can be to the area, the better. I perched on the bathroom counter, which allowed me to steady the brush by placing my wrist/palm against the wall
*if your piece has several lines of lettering, I suggest letting each line dry before moving on to the next one. It gives your fingers a break :) and once the previous line is dry, you can paint from below or above the line you're working on w/o worrying about smearing the work you just finished


4.  Let paint dry completely before erasing pencil lines.
*acrylic is very forgiving, so if you mess up, simply wet a q tip and fix any mistakes. you can always go back and touch up, so no need to stress


Enjoy!
~Nicole

Friday, April 26, 2013

Antirrhinum: Like a Nose.

Do you know what Antirrhinum is? Neither did I! It's the scientific name for a flower "like a nose": Snapdragon.

I cut some lovely Snapdragons this morning to compose a lush, colorful bouquet for the house. I wish I loved the summer heat (which is coming!) enough to endure the laborious weed-pulling demanded by a garden, but I don't. I'm over it.

For now, I'm grateful to trim from my friend Ingrid's beautiful flower beds. 


Hoping your weekend is as colorful & cheery as this bouquet.
~Nicole

Monday, April 15, 2013

Yarn & Nail Word Art

Happy Monday all! Kara is in the process of becoming a first-time homeowner, which brings a long to-do list and some rather large projects. 

We want to honor the smaller, more enjoyable part of moving- decorating! Here's an art piece that any homeowner, renter or person with a room will enjoy! Nicole's instructions & tips follow.


I was inspired by a pinterest find, where the nails & string defined hearts, but have really wanted to create an artwork of one of my favorite sayings, so I took a different route.

Here's what you'll need to get this fun project going:
~scrap of wood (stained or natural)
~nails, I used decorative 1/2" nails with black heads (not the ones on faces:))
~yarn/string in various colors/widths
~scissors
~chalk
~hammer (smaller head is a bit easier to maneuver and hurts phalanges less)
~scrub brush, water, towel

1. Draw/trace your words onto the board using chalk
 *whatever you put onto the board will have to be washed off once the nails are in place, so don't go too crazy

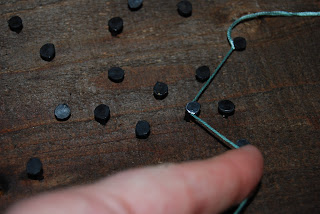
2. Hammer nails on chalk line using equal spacing and don't be afraid to stray from the original.
*you want the nails at least halfway in, so use those muscles and watch your fingers!

3. Be wiser than me and wash the chalk off with a scrub brush now, so you aren't doing it later with the string already in place.

4. Grab your string and get ready to wrap

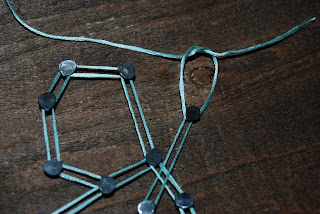
*I started my string at the end of the last letter of each word and tied a single knot with a 4" tail. I then held the loose end with one hand as I began wrapping the spool of string around the first few nails to create tension
*If you are defining delicate things, a smaller/tighter string will create the most definition
I tried to use the yarn of "LOVE" to outline "do everything in" and it was to bulky/fluffy. 

 5. Wrap sting around each nail head once and continue to next nail until you reach the beginning of the first letter, then begin wrapping your way back.


*Once you reach the end of the last letter, cut your string from the spool leaving quite a bit of extra- trust me! Tie a double knot with the two strands and don't trim the extra.

6. Wrap the next word, leave plenty of tail, tie a double knot and finish remaining words/images. 


7. If there's anything I've learned, but repeatedly forgotten in the haste of anticipation from years of creating art, it's this: CHECK your work!
*step back from the artwork and take a good, LONG look at it. Right color? Right spelling? I cut my tails and then realized I wrapped around the wrong nail and had to undo the entire word. stink! double check!

8. I wanted the tails of the cursive, smaller words to be unseen, so I used Tacky Glue to attach the ends to each other and then wrapped then underneath the nail head and trimmed them.


I hope this sparks an idea and helps make your casa more beautiful! If you get fired up and create your own, we'd love to see your spin on this. Email us a picture! 

~Nicole


Wednesday, April 10, 2013

Spring Into Summer Hats

Spring is sneaking in quietly and rather beautifully around here. Evenings bring out families on bicycles, rather handsome young men running with much more commitment than either of us and bright lavender-colored shrubs which reveal too late that they are not to be inhaled deeply. ever.

As we try to soak in this lovely season before it is cut short by the long, hot days of summer, you too may get the urge to buy the "perfect" summer hat.  So to help inspire everyone, we've gathered a few stylish inspirations that will also help protect you from the hot rays that are bound to shine upon us soon.

We found cute options on the major sites, but having an Etsy Shop motivated us to search within our own community to support small business. Enjoy!

1. thenunneryvintage: an androgynous, sleek option. the two-tone band and the side taper are smart.


2. frecklescalifornia: it may appear too much for some of us, but when else can you wear a neon pink chevron hat if not on the lake or out in the sun? go bold and get noticed!


3. EllaGajewskaHATS: the grey straw and geometric pattern are alike in color, but their textures help them stand apart.


4. sunhatinhandmade: we're all for being sexy and mysterious in big floppy hats, but when we can't see anything the allure of fashion fizzles. this hat offers a cute solution and reminds us of Anne of Green Gables. (Oh Gilbert Blythe!)


5. JessPlusCoutureSwim: if are willing to sacrifice some of your visual field- way to go! we are jealous because this marigold gem screams "soak me in summer sun" (hats DO talk)!


6. HatStore: This linen beauty woos us with its feminine bows and natural color that are reminiscent of 1950's country living. Yum.


7. theoriginaltree: whether you have hopes of attending the Kentucky Derby like Kara or wish you could have worn this to William & Kate's wedding, few of us in the States have occasion for such LOUD hats. we need to change that!


until next time
~k&n


Thursday, March 21, 2013

Etsy Photo Shoot

We have been busy with the Etsy shop (Yay!) and have talked several times about sprucing up the shop's photos. 

Well... we finally did it! We got our acts together last week and braved the 85 degree heatwave to capture a bit of a tan and some still-life style pics of the custom bridal & baby paper goods that Kara designs.

Here's a sneak peek, but don't stop there. Please check it out: Dottie Dakota Etsy Shop


Cheers
~k&n

Saturday, March 16, 2013

Meet Your Makers {Part II}

Afternoon! Want to finish off my (Nicole) style inspirations today and to keep you interested I'm including more photos. I'll gladly appease the masses! Plus it's fun to share nuggets of my past.


Earning my Bachelors of Fine Arts was tough, but so worth it! 

A two hour time difference combined with exhaustion of being 2000 miles from home caused me to oversleep my very first art class. I ran to the other end of campus in a panic. And of course my prof was the head of the Art Department. Lucky me. 

He was gracious that day, but the following quarter said I had to take my talent more seriously before I could enroll in more art classes. 

I quit farting around and thinking of art as "just fun", reentered the Art Department and declared my major with an emphasis in Studio Arts. 

The above self-portrait from Junior year was a defining moment. I had compared myself to others for too long. Envied their skills. Their perspective. Thought I had less to offer.

On the day that photo was taken, I became artist. A creator with my own perspective.


 For my Senior Show (above) I presented 'Reverie of Home' created over months of planning and two hundred+ hours of cutting, gluing, holding, breaking, re-gluing and re-holding balsa. It's a love-hate relationship. 

My parents flew in for opening night. I had a new haircut and BAD bangs. But otherwise it was surreal. The new head of the department, who months before seemed doubtful that I could pull it all together, told my dad he was pleasantly surprised and pleased with my final work. 

It was an indescribably proud moment to have a fellow installation artist acknowledge my efforts.


My friends and family considered me a "world traveler" because I went to college in...  Seattle, but I actually became one when I study abroad in Spain.

Based out of Salamanca, I took classes at the University founded in 1134, traveled to neighboring cities & Portugal on the weekends and fell in love with the cathedrals, history and orange slushies.


Prior to visiting Spain I gladly settled for and adored silver, but thirty days changed everything. Cathedrals adorned with centuries old stained glass. Arched soaring stone ceilings. Ornate baroque retablos of gold. Now I've got it bad for gold. And that's expensive!

My eyes are continually taking in new inspirations, so my style is constantly evolving. But I love that I can still look to certain periods in my life and experiences that continue to hold strong influences upon my unique taste!

That sums it up for me. Check in soon for Kara's inspiration post.


Best wishes for your weekend!
~k&n


Friday, March 15, 2013

Meet Your Makers!

Good Evening! As we kick off a push to regularly post and keep you in the loop, we can hear birds chirpin' outside open windows, which takes me (Nicole) back to spring days as a kid in Indiana. 

Those memories gave us the idea to start things off by sharing what has influenced our personal styles & tastes. So today I am going to give you a peak {part 1} into my influences and Kara's feature will follow next week. 


Thanks for joinin' with us on this new adventure!


Marsh Road Bridge in good ole' Indiana
This photo includes 3 of my style influences: nature, old/antique and sentimental.

Nature
I grew up in the sticks with little to do: movies, bonfires or DQ (still love M&M blizzards!). Summers with my 3 bros had adventures in woods, cornfields and the Big Ditch. 

By default, nature became a primary inspiration, but it stuck and the comments about the branches & tumbleweeds hanging in my house never cease.
   
Old/antique
Being raised on a chicken farm (not in, just on), people naturally gifted us anything with a chicken on it. My mom went with it and adorned the kitchen with all sorts of treasures from egg scales to mason jars. So now, I am drawn to anything old.

I have pulled too many u-turns to save a “treasure” from rain, dust and coyote urine and then lovingly cleaned out mouse turds and spider webs. I may need counseling. Hmm.

Sentimental
Heading to Seattle for college almost made me... a hoarder. When I graduated, there was a thrift store streak where I'd go weak in the knees for anything that reminded me of my childhood (or anything avocado green). 

Fortunately, my 50 cent impulse buys of grotesque things ended when I realized dusting loads of clutter was more stressful than the fond memories associated with those items.


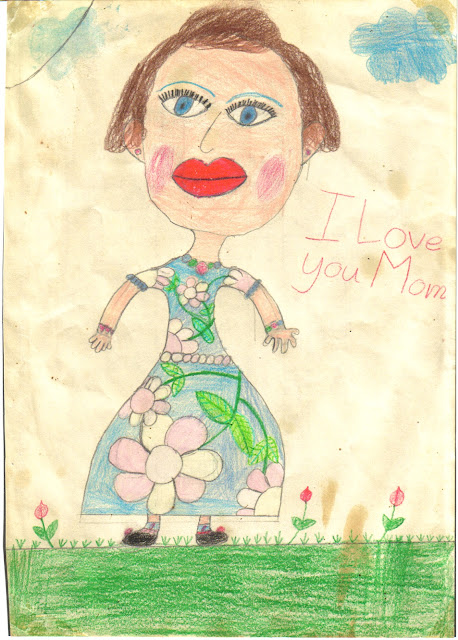
I'd like to think my parents saw talent in my drawing above, but I'm positive love trumps talent at age 9, so it hung in the kitchen for YEARS! 

I included this photo to emphasis the appreciation I have for artwork that showcases a handmade quality (notice the food stains- bah). 


I am a perfectionist, but there's something in me that time and time again is most drawn to work that isn't perfect because it's made by human hands. It reveals character. It breathes. It's perfect in its imperfection (oh Wabi-Sabi).

I'll wrap up my style influences on the next post, so check in tomorrow! 

What would you point to as the big influences on your personal style? Do you see your style evolving? 


We would love to hear from you!
~k&n