Monday, April 29, 2013

DIY Hand-Painted Wall Art

Isn't it the pits when you're all fired up for a project (like the cute ones you see on Pinterest) and part way in, everything goes wrong?

My friend was in the middle of adhering a supposedly self-adhesive saying to her bathroom wall. It was not going well because of the texture on the walls and then her darling niece made it worse by mangling half of the letters and guaranteeing they'd never stick. Oops.

I saw the aftermath and suggested we trace the letters onto the wall, peel off the sticker and fill in with acrylic paint. It takes a bit of time, but once it's done, it's not going anywhere!

Grab these items and maybe a glass of iced tea to get started:
~A saying or graphic you want to look at for a while
~pencil
~level or ruler
~eraser (Staedtler worked very well)
~tape
~paint brush (smaller= more control & definition)
~acrylic paint (cheap, quick-drying & water clean-up)
~paper towels & a few q tips for any mess ups

1. Prepare words/graphic for transfer. If using a projector, print onto transparency paper. Other ideas include buying letters from Joann's or Michael's, using Cricut or going old school and cutting letters/images out by hand.

The kit my friend bought had most of the words in black, but 'pray' in silver, so we had
planned to only hand-paint 'pray' in gold. Her niece's curiosity gave me a bit more to do!
2. If using words, lightly draw a level line in pencil where you want the lettering to be. Tape letters into place and step back to see if you like the placement from far away as well as close-up. Then start tracing. If using a graphic, simply pick the location and tape into place before beginning to trace.
* if walls are textured, like mine, it's okay that pencil marks are a bit rough- you can erase them after the paint has dried


3. Peel taped words/graphics off wall and get ready to paint! I had to do two coats, so focus the first coat on edging and the second on making the paint opaque.
*especially with lettering, the closer you can be to the area, the better. I perched on the bathroom counter, which allowed me to steady the brush by placing my wrist/palm against the wall
*if your piece has several lines of lettering, I suggest letting each line dry before moving on to the next one. It gives your fingers a break :) and once the previous line is dry, you can paint from below or above the line you're working on w/o worrying about smearing the work you just finished


4.  Let paint dry completely before erasing pencil lines.
*acrylic is very forgiving, so if you mess up, simply wet a q tip and fix any mistakes. you can always go back and touch up, so no need to stress


Enjoy!
~Nicole

Friday, April 26, 2013

Antirrhinum: Like a Nose.

Do you know what Antirrhinum is? Neither did I! It's the scientific name for a flower "like a nose": Snapdragon.

I cut some lovely Snapdragons this morning to compose a lush, colorful bouquet for the house. I wish I loved the summer heat (which is coming!) enough to endure the laborious weed-pulling demanded by a garden, but I don't. I'm over it.

For now, I'm grateful to trim from my friend Ingrid's beautiful flower beds. 


Hoping your weekend is as colorful & cheery as this bouquet.
~Nicole

Monday, April 15, 2013

Yarn & Nail Word Art

Happy Monday all! Kara is in the process of becoming a first-time homeowner, which brings a long to-do list and some rather large projects. 

We want to honor the smaller, more enjoyable part of moving- decorating! Here's an art piece that any homeowner, renter or person with a room will enjoy! Nicole's instructions & tips follow.


I was inspired by a pinterest find, where the nails & string defined hearts, but have really wanted to create an artwork of one of my favorite sayings, so I took a different route.

Here's what you'll need to get this fun project going:
~scrap of wood (stained or natural)
~nails, I used decorative 1/2" nails with black heads (not the ones on faces:))
~yarn/string in various colors/widths
~scissors
~chalk
~hammer (smaller head is a bit easier to maneuver and hurts phalanges less)
~scrub brush, water, towel

1. Draw/trace your words onto the board using chalk
 *whatever you put onto the board will have to be washed off once the nails are in place, so don't go too crazy

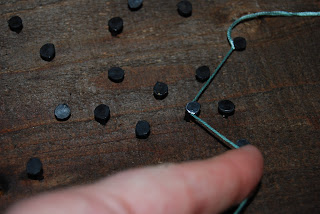
2. Hammer nails on chalk line using equal spacing and don't be afraid to stray from the original.
*you want the nails at least halfway in, so use those muscles and watch your fingers!

3. Be wiser than me and wash the chalk off with a scrub brush now, so you aren't doing it later with the string already in place.

4. Grab your string and get ready to wrap

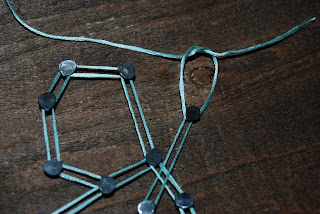
*I started my string at the end of the last letter of each word and tied a single knot with a 4" tail. I then held the loose end with one hand as I began wrapping the spool of string around the first few nails to create tension
*If you are defining delicate things, a smaller/tighter string will create the most definition
I tried to use the yarn of "LOVE" to outline "do everything in" and it was to bulky/fluffy. 

 5. Wrap sting around each nail head once and continue to next nail until you reach the beginning of the first letter, then begin wrapping your way back.


*Once you reach the end of the last letter, cut your string from the spool leaving quite a bit of extra- trust me! Tie a double knot with the two strands and don't trim the extra.

6. Wrap the next word, leave plenty of tail, tie a double knot and finish remaining words/images. 


7. If there's anything I've learned, but repeatedly forgotten in the haste of anticipation from years of creating art, it's this: CHECK your work!
*step back from the artwork and take a good, LONG look at it. Right color? Right spelling? I cut my tails and then realized I wrapped around the wrong nail and had to undo the entire word. stink! double check!

8. I wanted the tails of the cursive, smaller words to be unseen, so I used Tacky Glue to attach the ends to each other and then wrapped then underneath the nail head and trimmed them.


I hope this sparks an idea and helps make your casa more beautiful! If you get fired up and create your own, we'd love to see your spin on this. Email us a picture! 

~Nicole


Wednesday, April 10, 2013

Spring Into Summer Hats

Spring is sneaking in quietly and rather beautifully around here. Evenings bring out families on bicycles, rather handsome young men running with much more commitment than either of us and bright lavender-colored shrubs which reveal too late that they are not to be inhaled deeply. ever.

As we try to soak in this lovely season before it is cut short by the long, hot days of summer, you too may get the urge to buy the "perfect" summer hat.  So to help inspire everyone, we've gathered a few stylish inspirations that will also help protect you from the hot rays that are bound to shine upon us soon.

We found cute options on the major sites, but having an Etsy Shop motivated us to search within our own community to support small business. Enjoy!

1. thenunneryvintage: an androgynous, sleek option. the two-tone band and the side taper are smart.


2. frecklescalifornia: it may appear too much for some of us, but when else can you wear a neon pink chevron hat if not on the lake or out in the sun? go bold and get noticed!


3. EllaGajewskaHATS: the grey straw and geometric pattern are alike in color, but their textures help them stand apart.


4. sunhatinhandmade: we're all for being sexy and mysterious in big floppy hats, but when we can't see anything the allure of fashion fizzles. this hat offers a cute solution and reminds us of Anne of Green Gables. (Oh Gilbert Blythe!)


5. JessPlusCoutureSwim: if are willing to sacrifice some of your visual field- way to go! we are jealous because this marigold gem screams "soak me in summer sun" (hats DO talk)!


6. HatStore: This linen beauty woos us with its feminine bows and natural color that are reminiscent of 1950's country living. Yum.


7. theoriginaltree: whether you have hopes of attending the Kentucky Derby like Kara or wish you could have worn this to William & Kate's wedding, few of us in the States have occasion for such LOUD hats. we need to change that!


until next time
~k&n